Learning Git - Chapter 7
Creating and Pushing to a Remote Repository
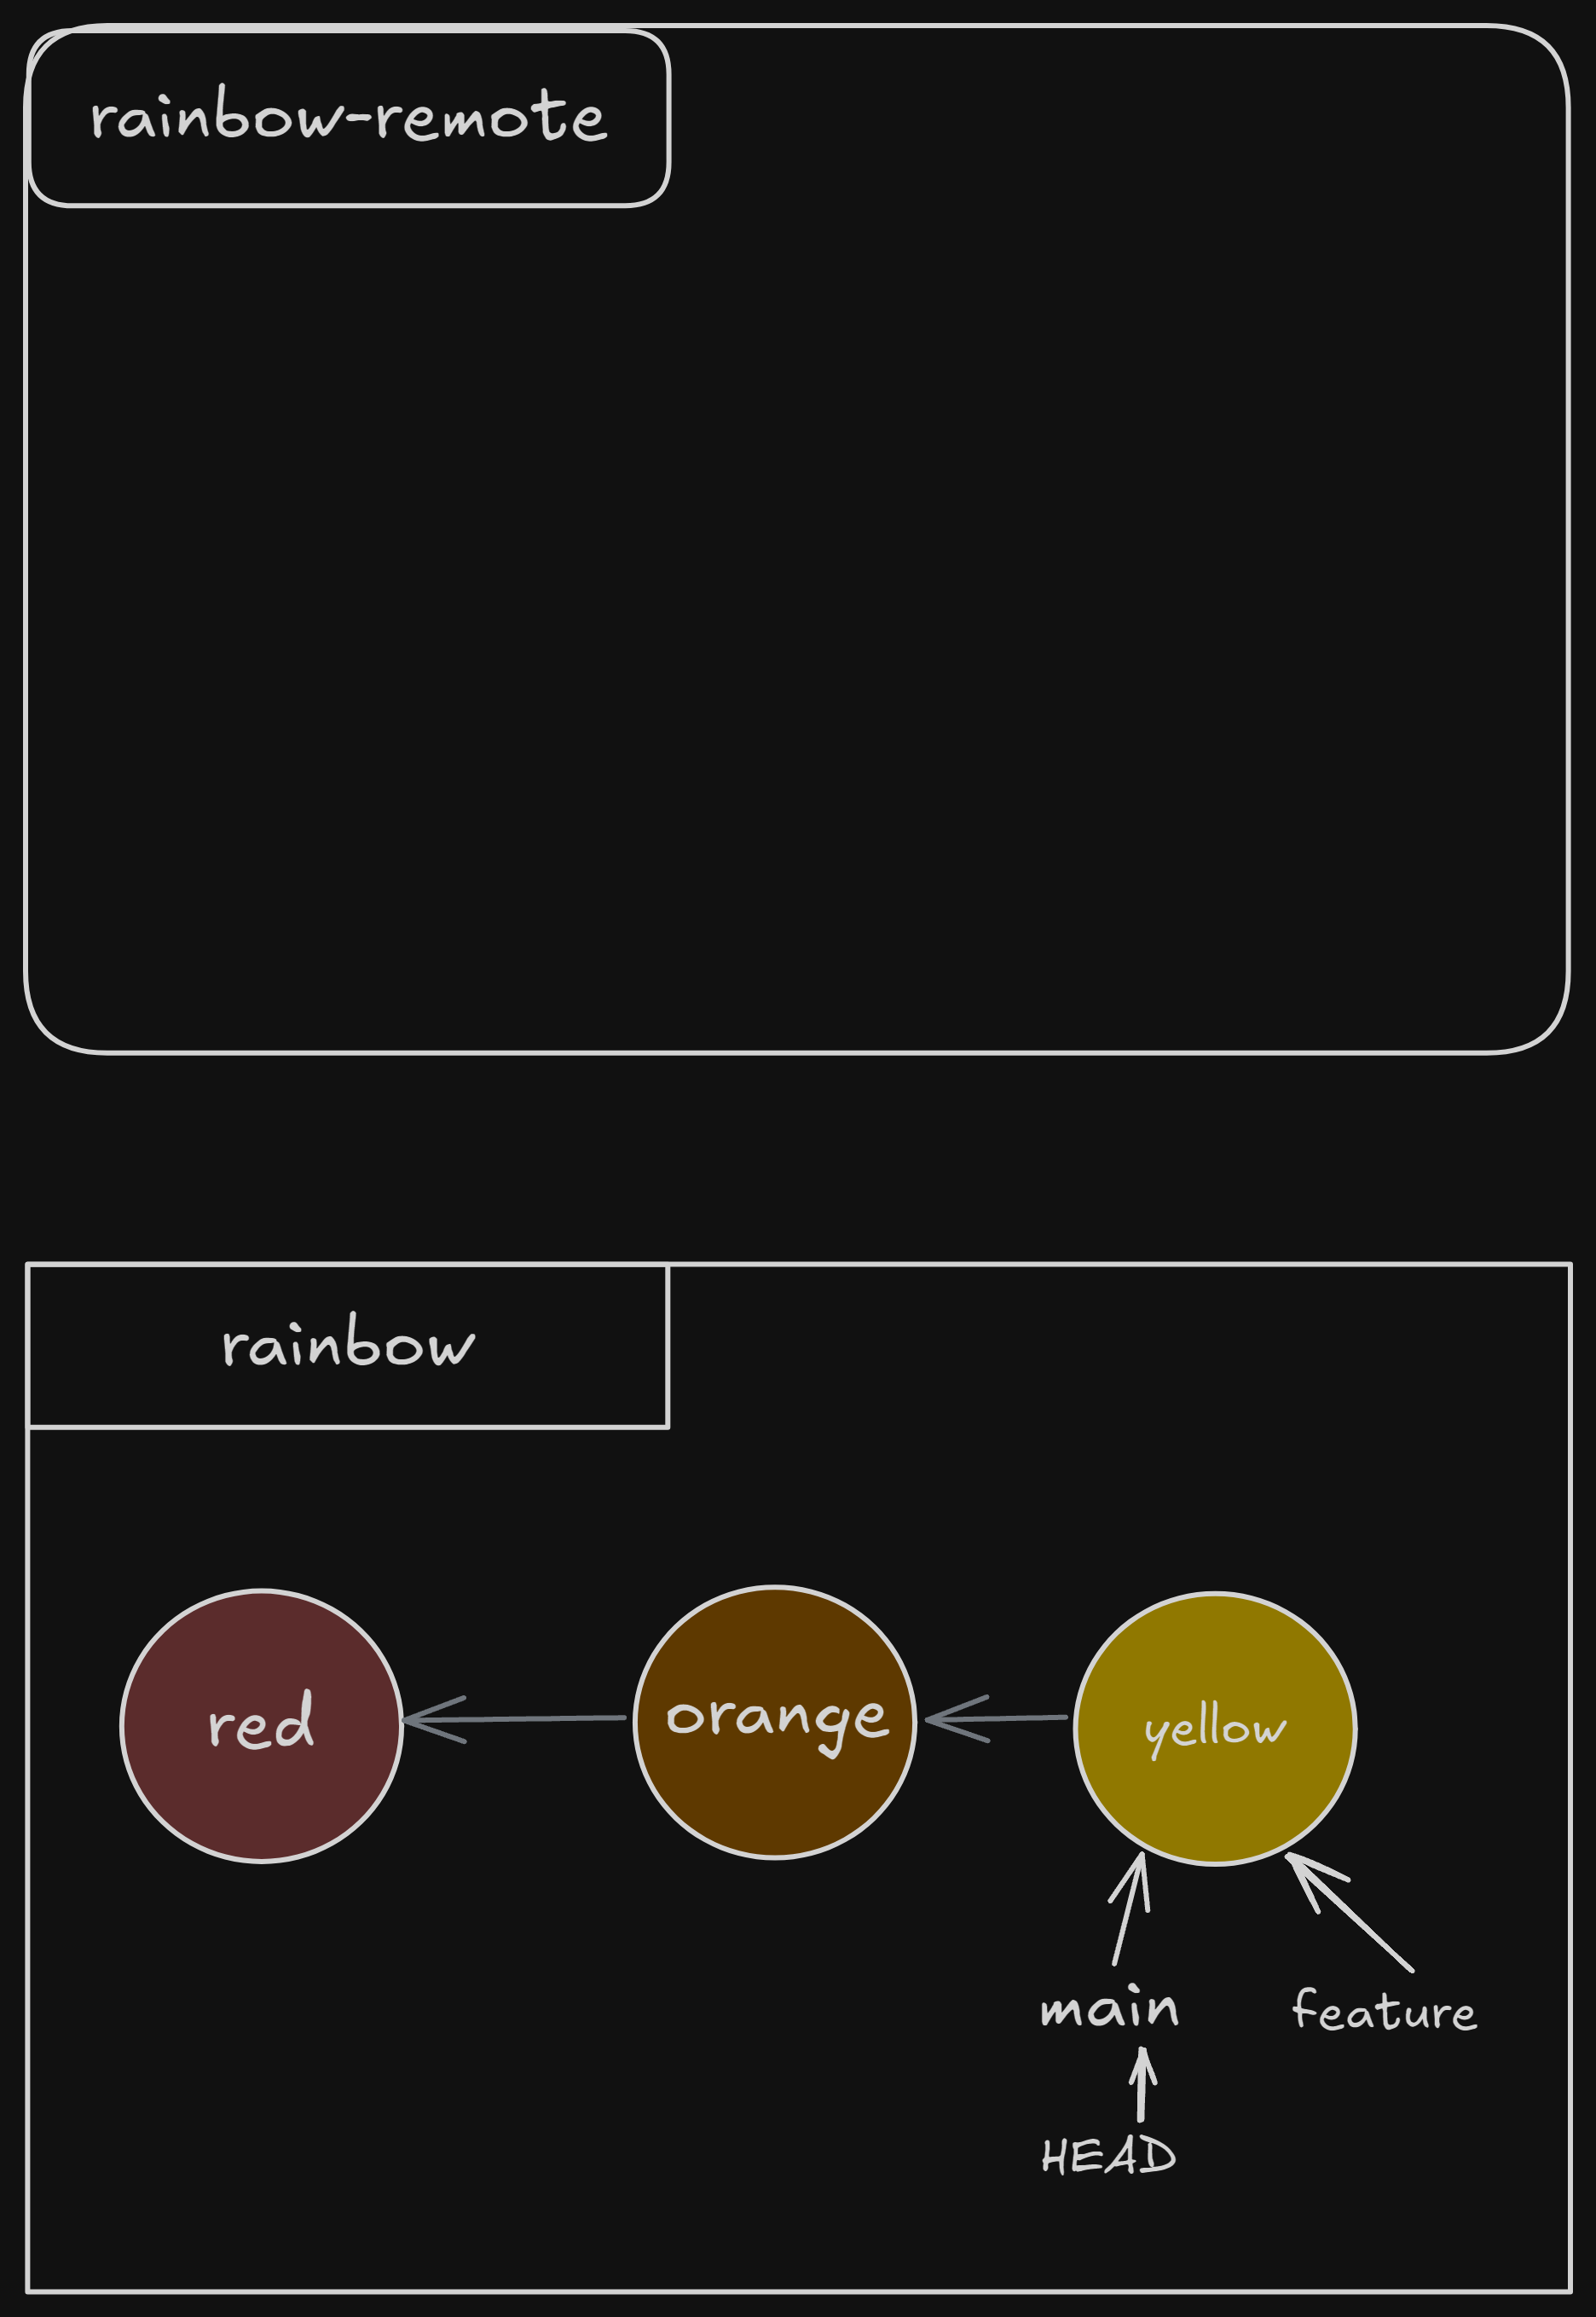
Currently, we have three commits, red, orange, and yellow. We have two branches, both of them (head and feature) pointing at our yellow commit, and HEAD is attached to main.
Now that we’re beginning to talk about remote repositories, it’s important to understand how these projects are started. We’ve been working on our Rainbow project, which we know is a local repository.
That’s our first way; to start from a local repository. We already looked at how to start a local repository, so there are only two more steps: Create a remote repository using your service of choice, then push your local repository to your remote repository. We can use the git push command to make this happen.
The other way is to start from a remote repository. If you want to work on someone else’s project, or you created an empty remote repository, you would need to clone the repository to your local machine to start working.
Even if we have our local repository pushed into a remote repository, and changes made to either won’t reflect in the other unless explicitly told to do so. That means when you make a commit in your local repository, it won’t have any changes to the remote repository until you push them.
Remote repositories utility cannot be understated; having access to all of your projects wherever you go, as well as being able to have collaborators and contribute to other people’s projects, really makes this a worthwhile feature.
[!Example Book Project] Once again we’re back to working on our book project. If I never decided to upload my work into remote repository, and my laptop got stolen or damaged, all of my work is lost. It would also be nice to have two workstations, and I can easily transfer my work from machine to machine without losing anything in the process.
To create our Rainbow project remote repository, we’re going to have to create it, connect it, and push our directory into it.
Creating the Remote Repository
The creation and configuration is a split process between the local repository and the website of your hosting provider. GitHub will need a remote repository name, and will provide you with a URL (provided in both SSH and HTTPS).
To ensure as little confusion as possible, we’re going to name our remote repository differently than our local. We’ll call it remote-repository. You’ll also be option to give the remote repository the option to be public or private. Private means that only you have access to it, while Public will leave it open for anyone on the internet to get access to it.
Some remote repository providers will ask for additional files (Either a README or a .gitignore) but we’ll ignore that for now, since we want to upload our entire local directory as is. The default branch name should also be main.
You should now have an empty remote repository. We still have to link them, which is what the git remote command is for. The syntax to make this connection is as follows;
git remote add <shortname> <URL>
Remember, we are going to use HTTPS for this, so URL is going to be the URL provided by GitHub, while the shortname will be whatever you call that connection for future use. Like we know from the first few chapters in the history of Git, we should probably use origin for our shortname, since that’s the default value used anyways.
You could also use git remote by itself to return all of the remote repository connections used in your local repository, and git remote -v to grab their shortname’s and URL’s.
For me, my command flow looked like this;
>>> git remote # noticing I don't have anything returned
>>> git remote add origin https://github.com/mr-pointing/rainbow-remote.git
>>> git remote
origin      # now I have the shortname (origin) appearing
If we were to add onto our diagram from just before, there would now be a line going from our local repository, pointing to our new remote repository. However, it would still be empty, and it’s important to note this is only a one way relationship; the local repository is not receiving anything from the remote.
Remote Branches and Remote-Tracking Branches
A remote branch is just a branch in a remote repository, pretty simple. However it seems that they work a little differently than our local branches. They don’t update alongside our local commits; they will only be updated with a push.
Another branch that seems important is the remote-tracking branch, which acts like a placeholder for the remote repository. It’s a reference inside your local repo for your remote repo (I’m going to start abbreviating repository to repo mid sentence, it’s just faster and easier at this point) that has a pointer to the commit that the remote repository had at the last connection, sometimes referred as the upstream branch. This is sometimes chosen by Git, but otherwise can be chosen (we’ll come back to this in Chapter 9).
Let’s actually make that push we were just talking about. We can use the following syntax to make a push onto a remote repo;
git push <shortname> <branch_name>
When doing this, you’ll actually create both a remote branch and a remote-tracking branch. We’ll also be able to use git branch --all to see the new branch changes.
Also, before we do this, make sure to point HEAD at main, and your on your yellow commit. Also, this took me forever to understand, but I think because I was using Linux I needed to generate a Personal Access Token in your developer settings, and it wouldn’t accept my password as authentication.
>>> git push origin main
Username for 'https://github.com': mr-pointing
Password for 'https://[email protected]':
Enumerating objects: 9, done.
Counting objects: 100% (9/9), done.
Delta compression using up to 4 threads
Compressing objects: 100% (5/5), done.
Writing objects: 100% (9/9), 744 bytes | 744.00 KiB/s, done.
Total 9 (delta 1), reused 0 (delta 0), pack-reused 0
remote: Resolving deltas: 100% (1/1), done.
To https://github.com/mr-pointing/rainbow-remote.git
 * [new branch]      main -> main
branch 'main' set up to track 'origin/main'.
>>> git branch --all
  feature
* main
  remotes/origin/main
>>> git log
commit 43a7cffeceeaa1be4b55e94f4769ff5dc154cde4 (HEAD -> main, origin/main, feature)
Author: mr-pointing <[email protected]>
Date:   Sat Sep 14 16:57:14 2024 -0400

    yellow

commit ae65b50098378ac6bf0cbe9ab92a9884b98db61b
Author: mr-pointing <[email protected]>
Date:   Fri Sep 13 15:59:13 2024 -0400

    orange

commit f54fa770db92bbe31125032abb853f7dd6af414b
Author: mr-pointing <[email protected]>
Date:   Thu Sep 12 15:59:22 2024 -0400

    red
Our visualization now looks like this;
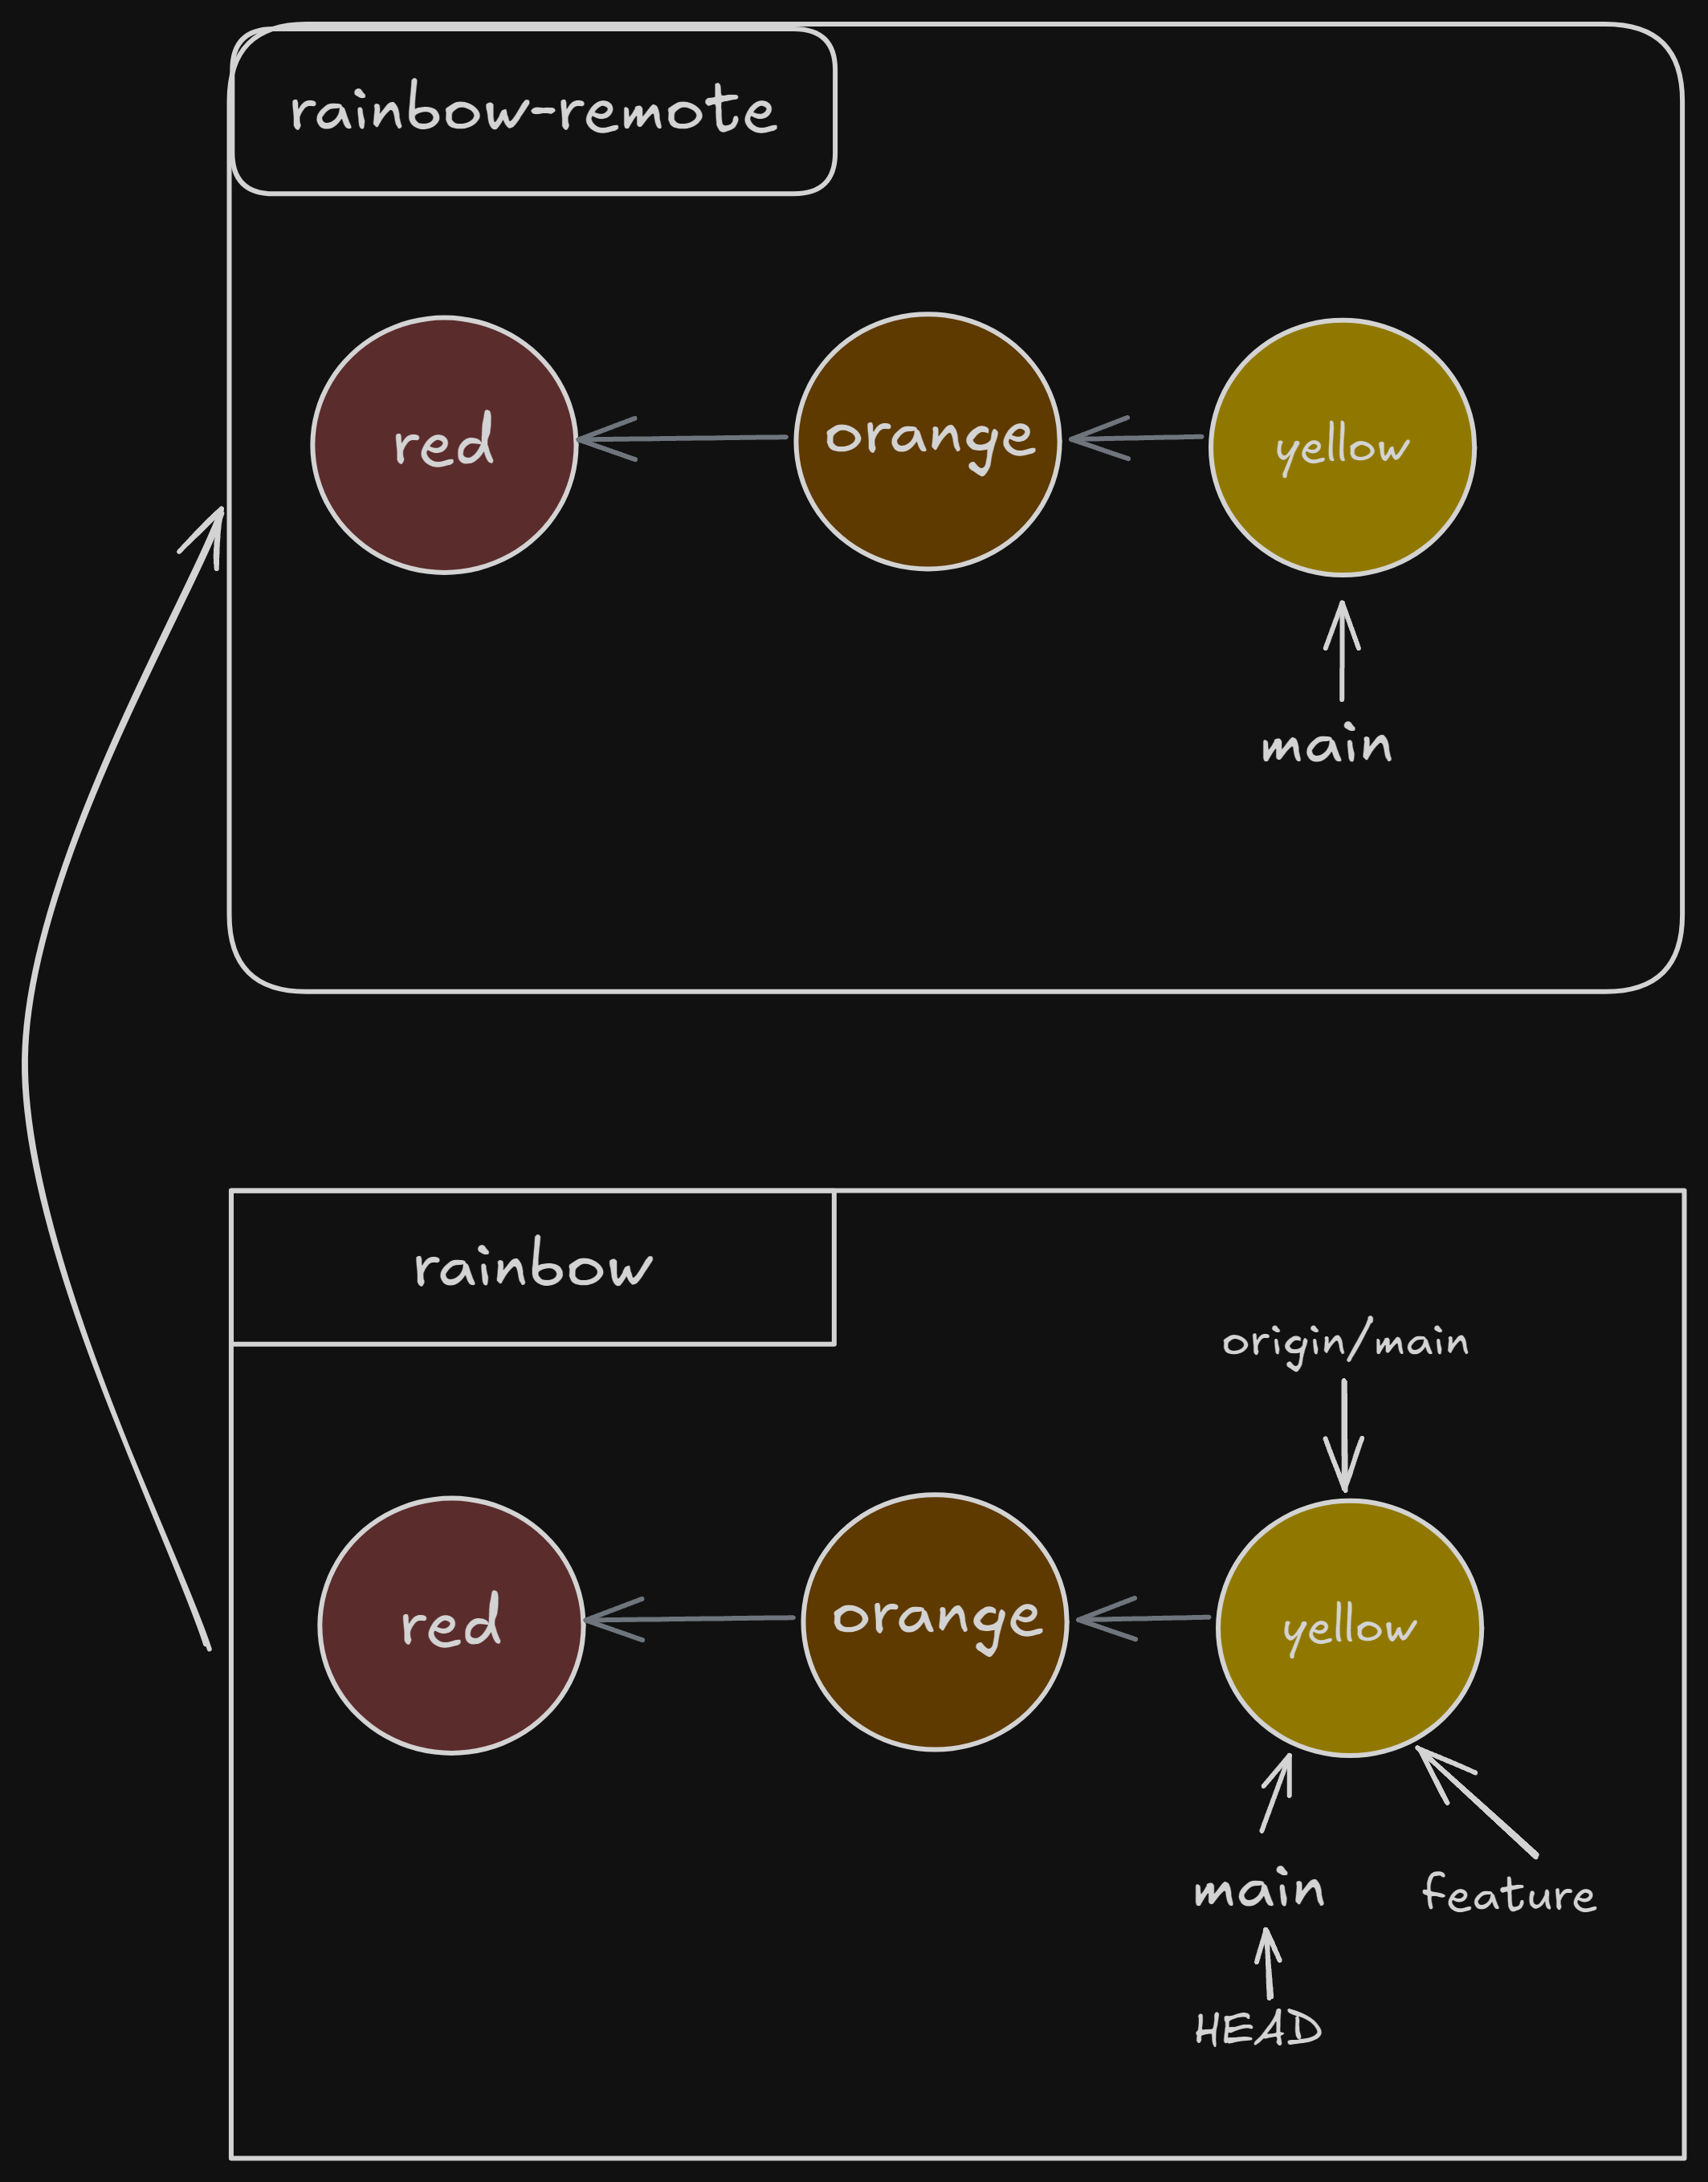
We now have our remote branch reflecting the branch we committed. Importantly, that means we don’t have the feature branch as a part of our remote repo. We’ll have to do this manually;
>>> git switch feature
Switched to branch 'feature'
>>> git push origin feature
Username for 'https://github.com': mr-pointing
Password for 'https://[email protected]':
Total 0 (delta 0), reused 0 (delta 0), pack-reused 0
remote:
remote: Create a pull request for 'feature' on GitHub by visiting:
remote:      https://github.com/mr-pointing/rainbow-remote/pull/new/feature
remote:
To https://github.com/mr-pointing/rainbow-remote.git
 * [new branch]      feature -> feature
>>> git branch --all
* feature
  main
  remotes/origin/feature
  remotes/origin/main
>>> git log
commit 43a7cffeceeaa1be4b55e94f4769ff5dc154cde4 (HEAD -> feature, origin/main, origin/feature, main)
Author: mr-pointing <[email protected]>
Date:   Sat Sep 14 16:57:14 2024 -0400

    yellow

commit ae65b50098378ac6bf0cbe9ab92a9884b98db61b
Author: mr-pointing <[email protected]>
Date:   Fri Sep 13 15:59:13 2024 -0400

    orange
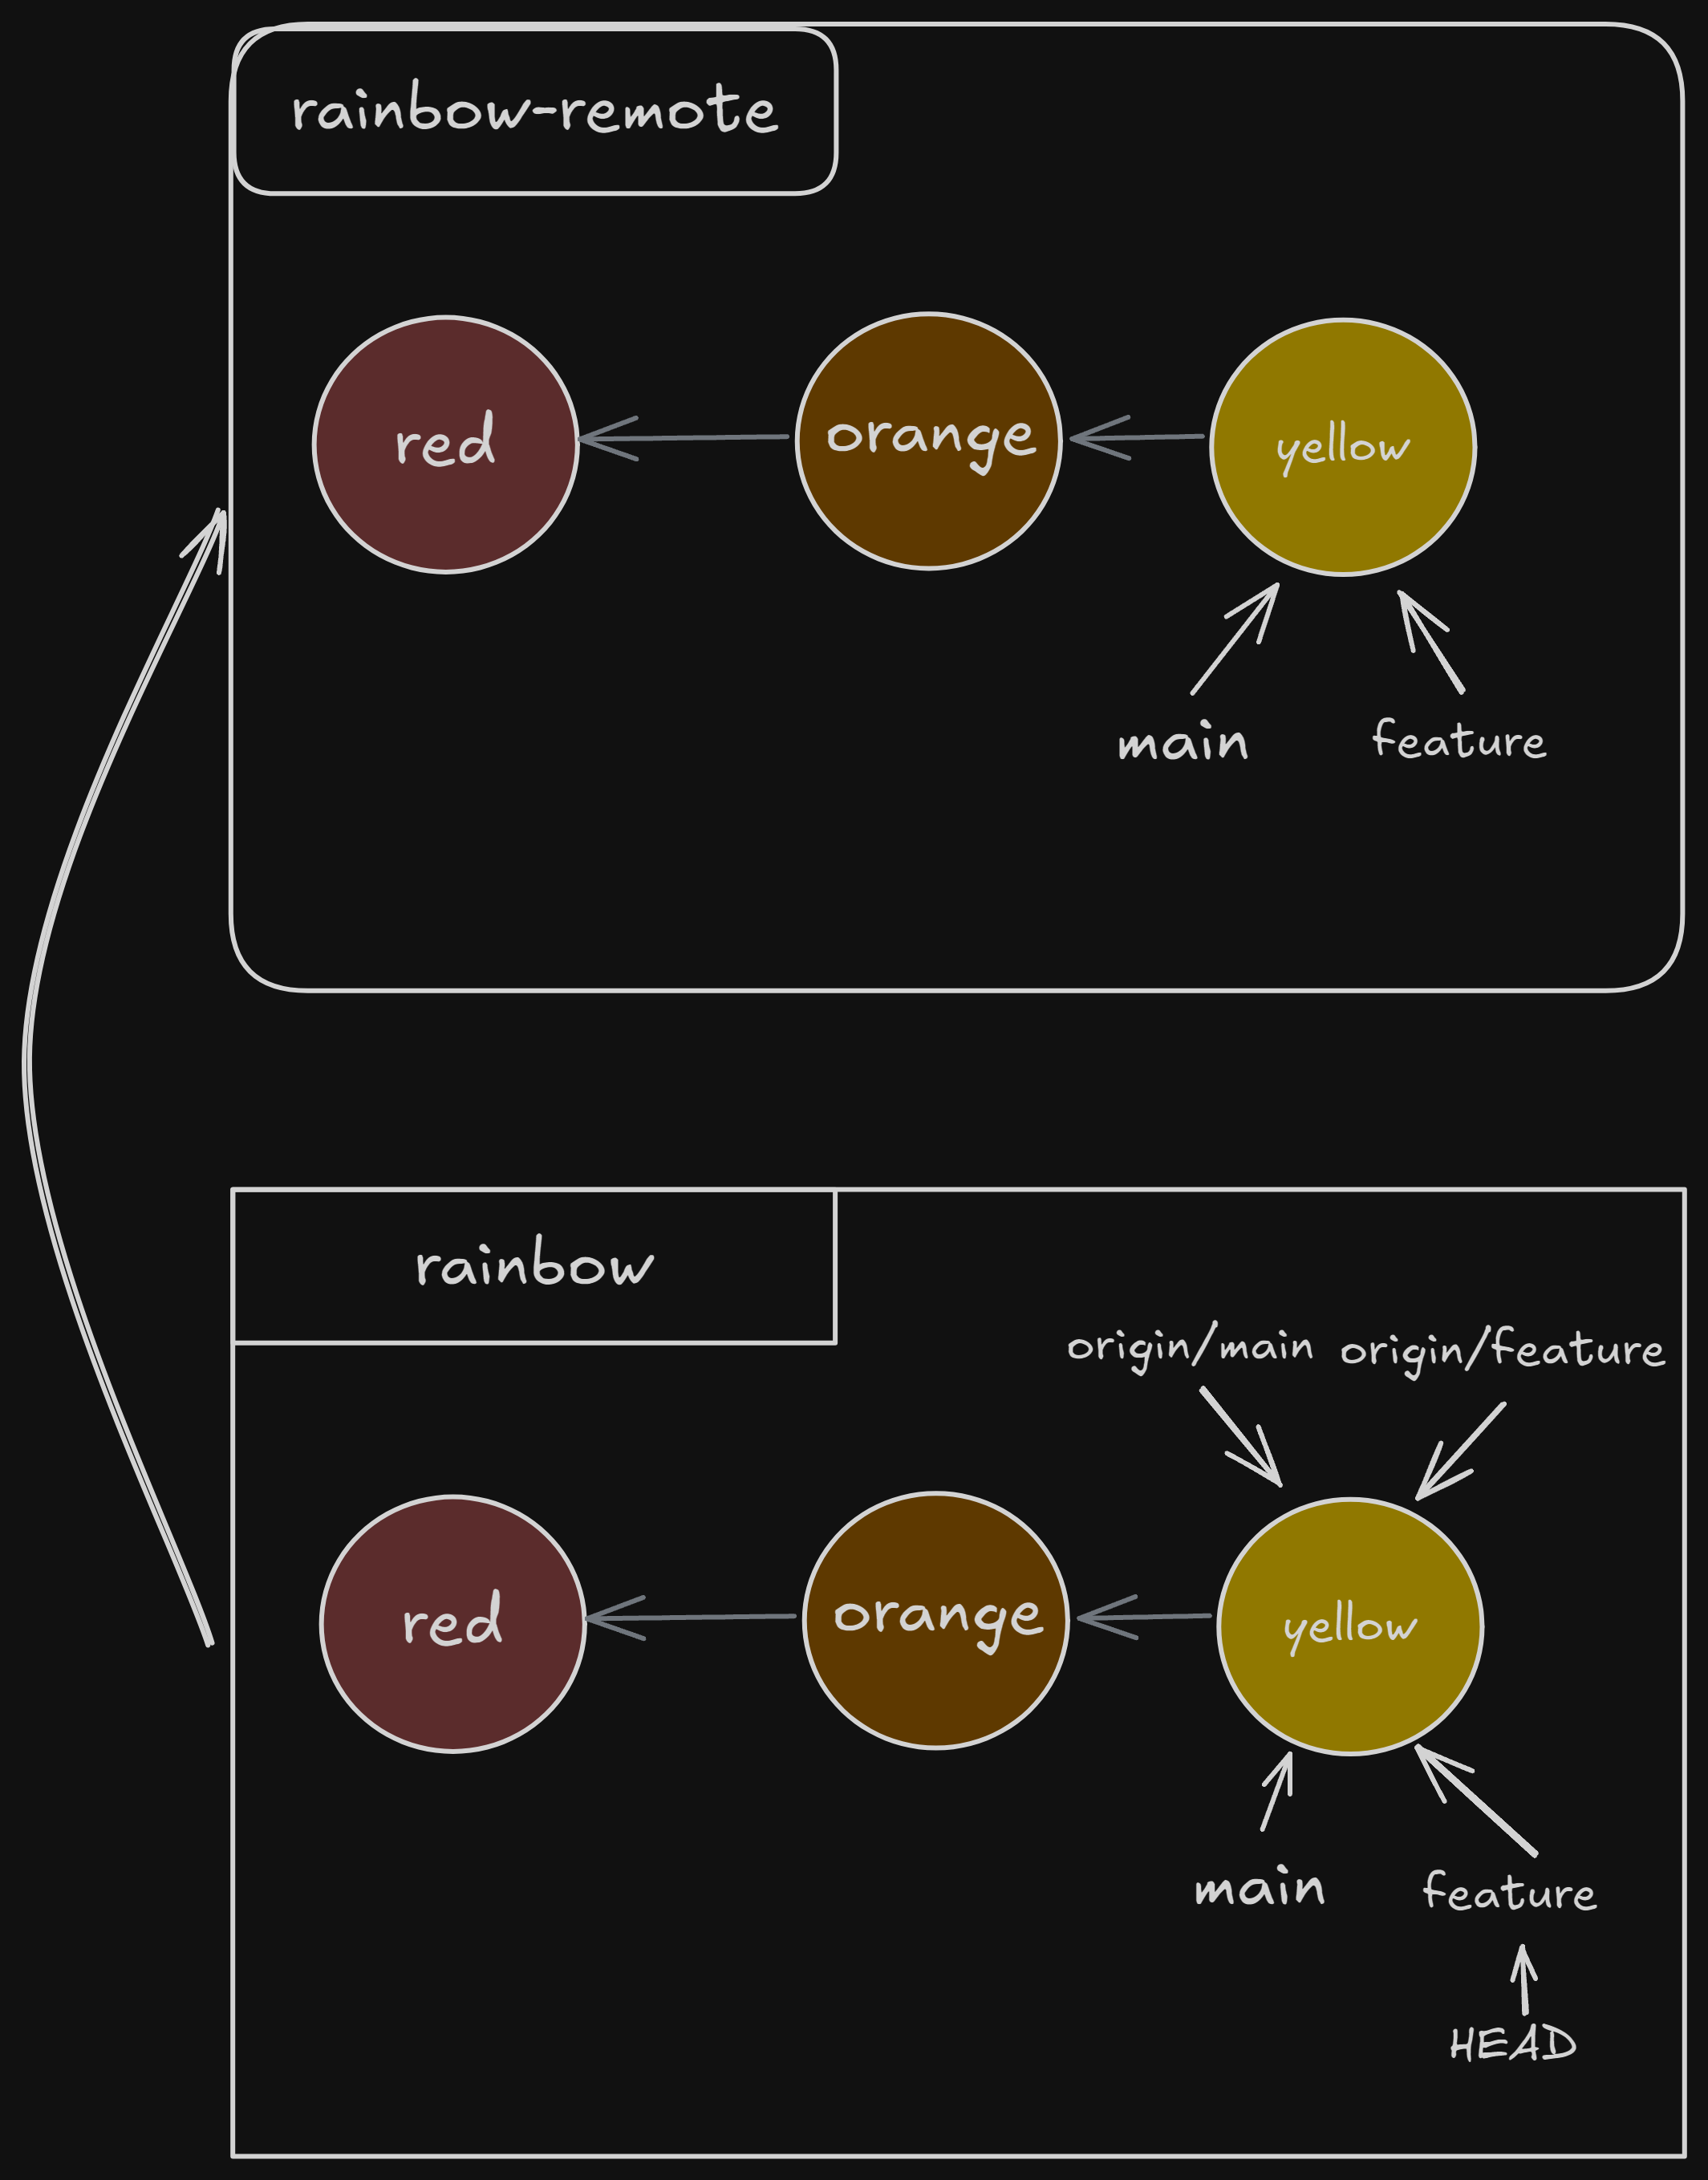
Our visualization now looks something like this;
Next: Chapter 8