Learning Git - Chapter 5
Merging
We last looked at how branches can help a team work on a project together, without losing or any conflicting progress. Now for the logical next step- combining the work together into one branch. We call this merging, or the combining of work from different branches.
The source branch is the merging branch, or where the work is coming from. The target branch is the branch you’re merging into. The only branch altered in a merge is the target branch.
[!Example Book Project] Just like before, I’m working with my editor on my new book. Now that we understand merging as a concept, let’s shift our workflow around a bit; I want to start a new branch for every chapter. Let’s say I’ve completed three chapters so far and I’m working on
main. To begin working on chapter four, I would make a new branch calledchapter_fourand work there until I got editor approval. Once it’s finished, I can merge thechapter_fourbranch intomain.
Types of Merges
The type of merge that happens depends on the state of the target branch and source branch and if their development history has diverged. What does this mean? Let’s consider our last diagram from the text’s chapter four; yellow’s development history is the list of previous parent commits.
As it currently stands, the development history of main is orange and red, while feature has yellow, orange, and red.
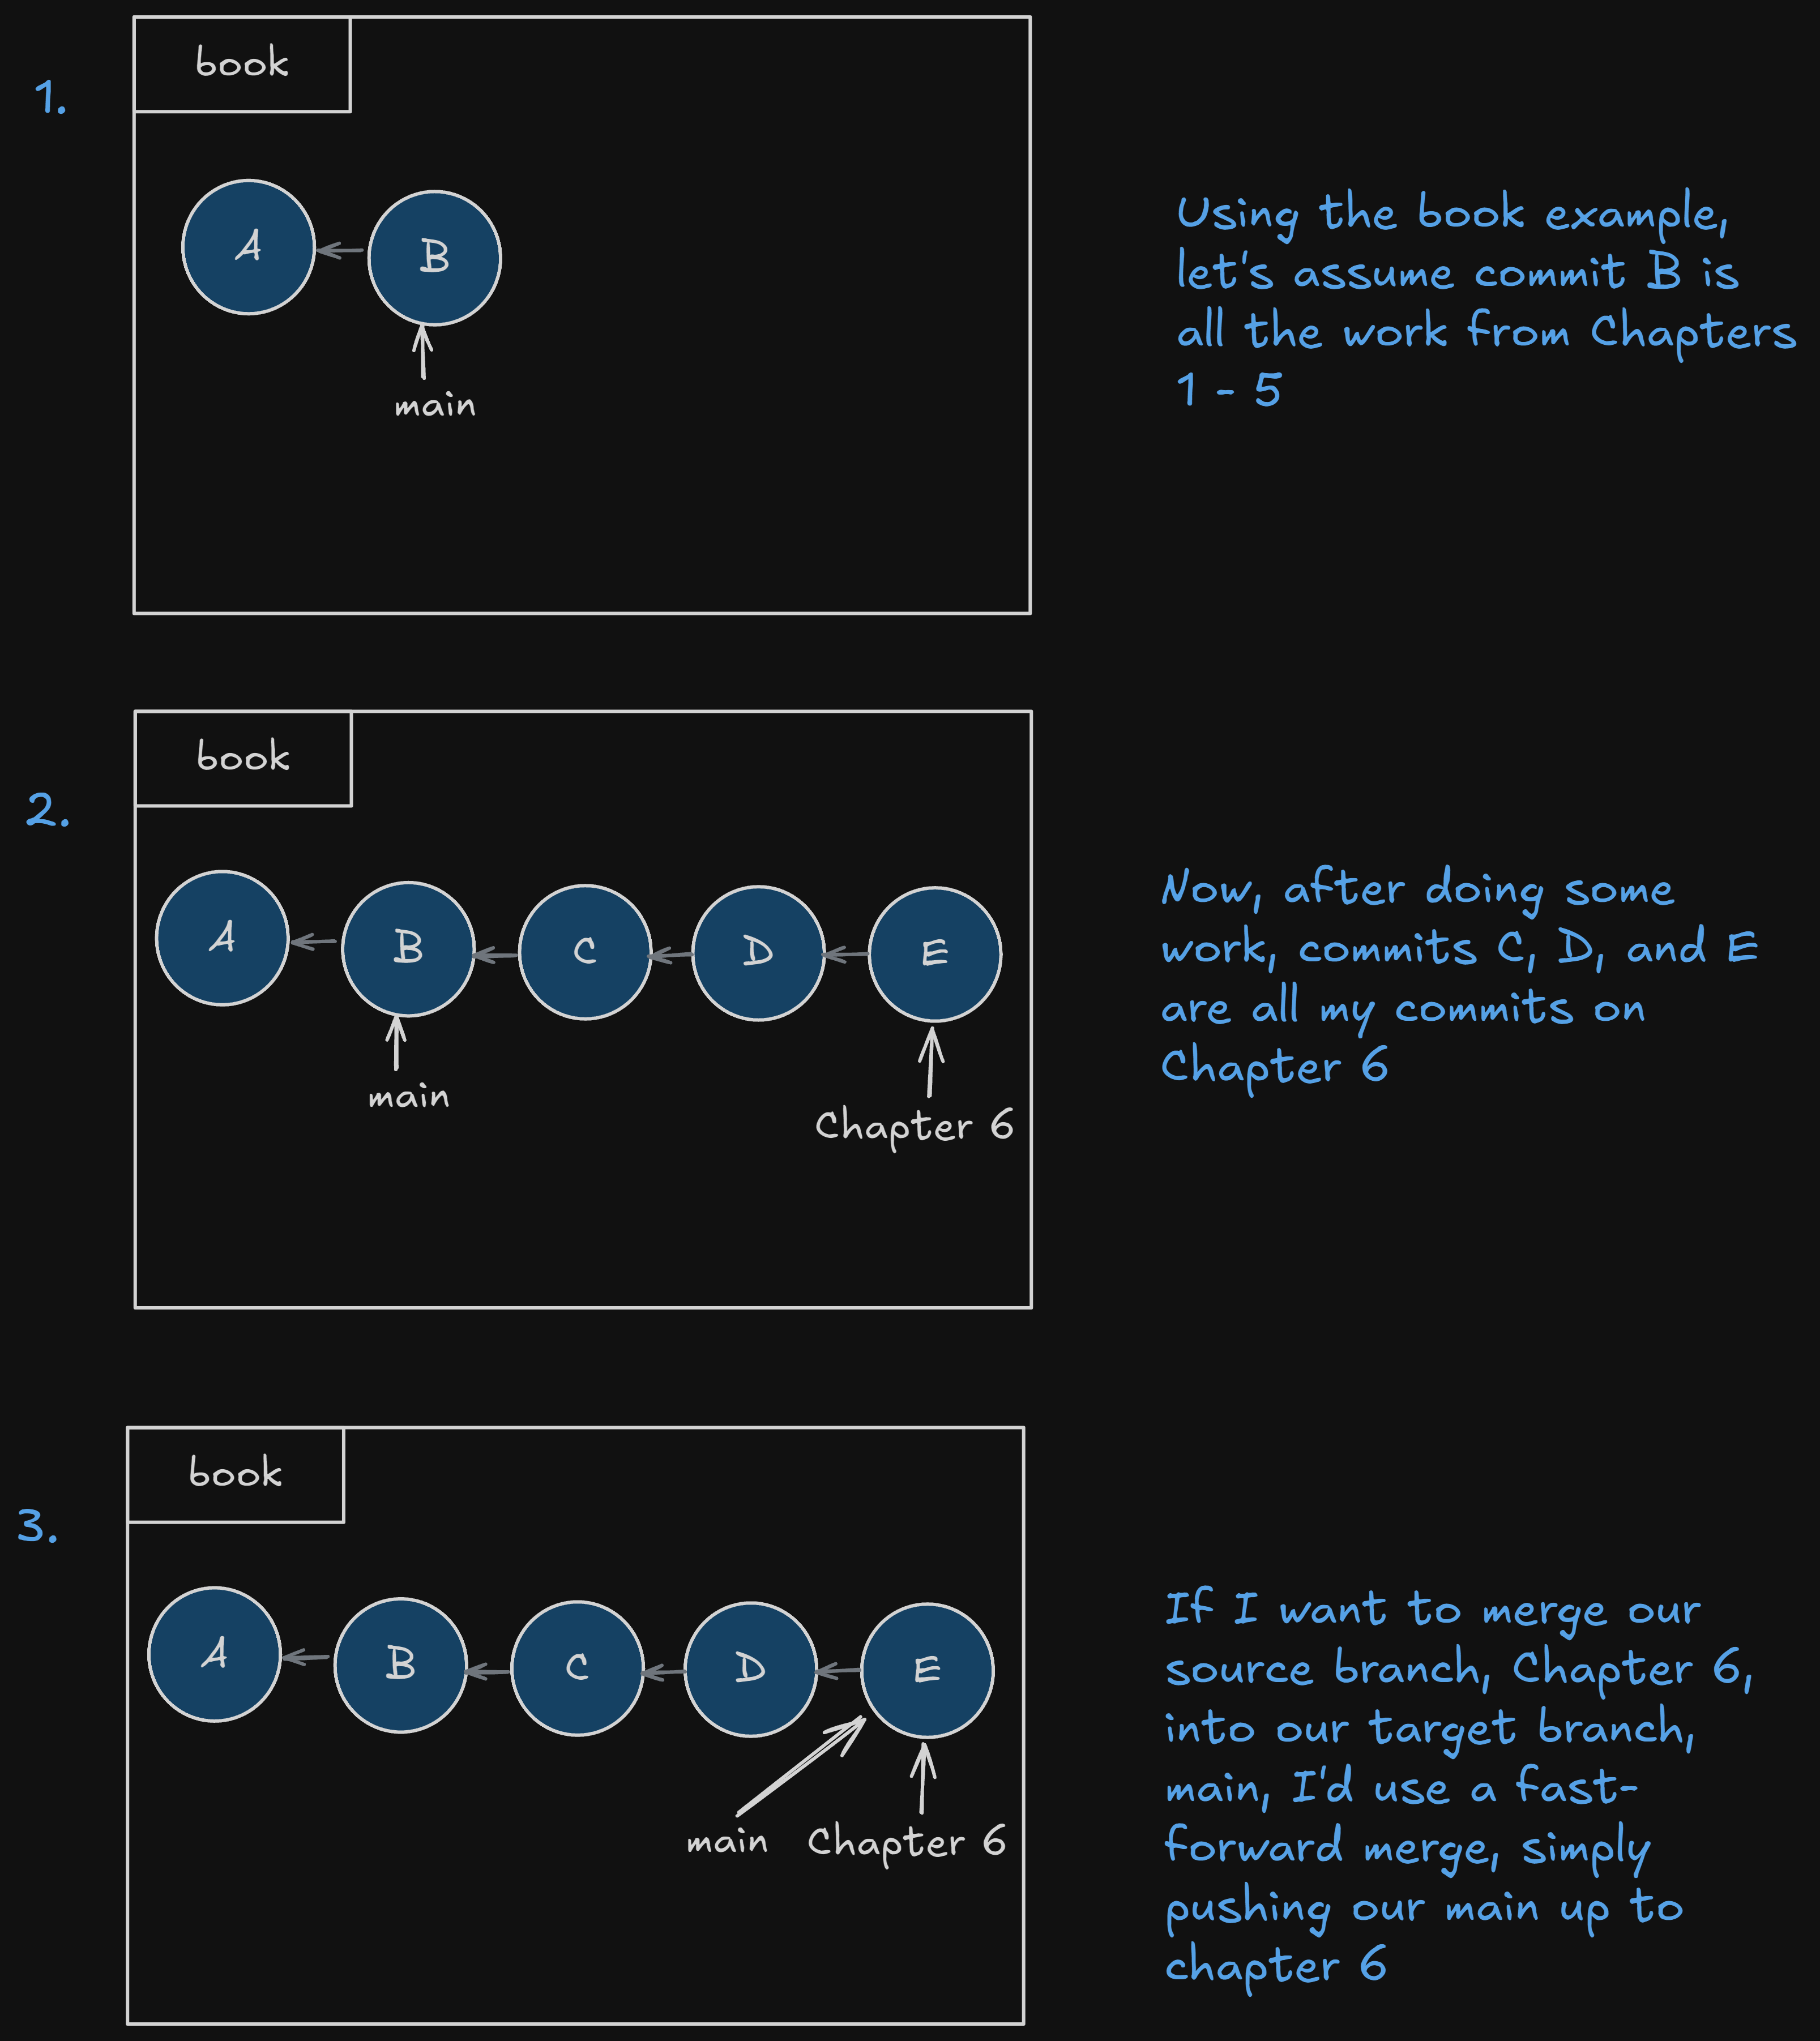
If we can get to one branch through the commit history of another branch they have not diverged, and we would perform a fast-forward merge.
Example of a Fast-Forward Merge:
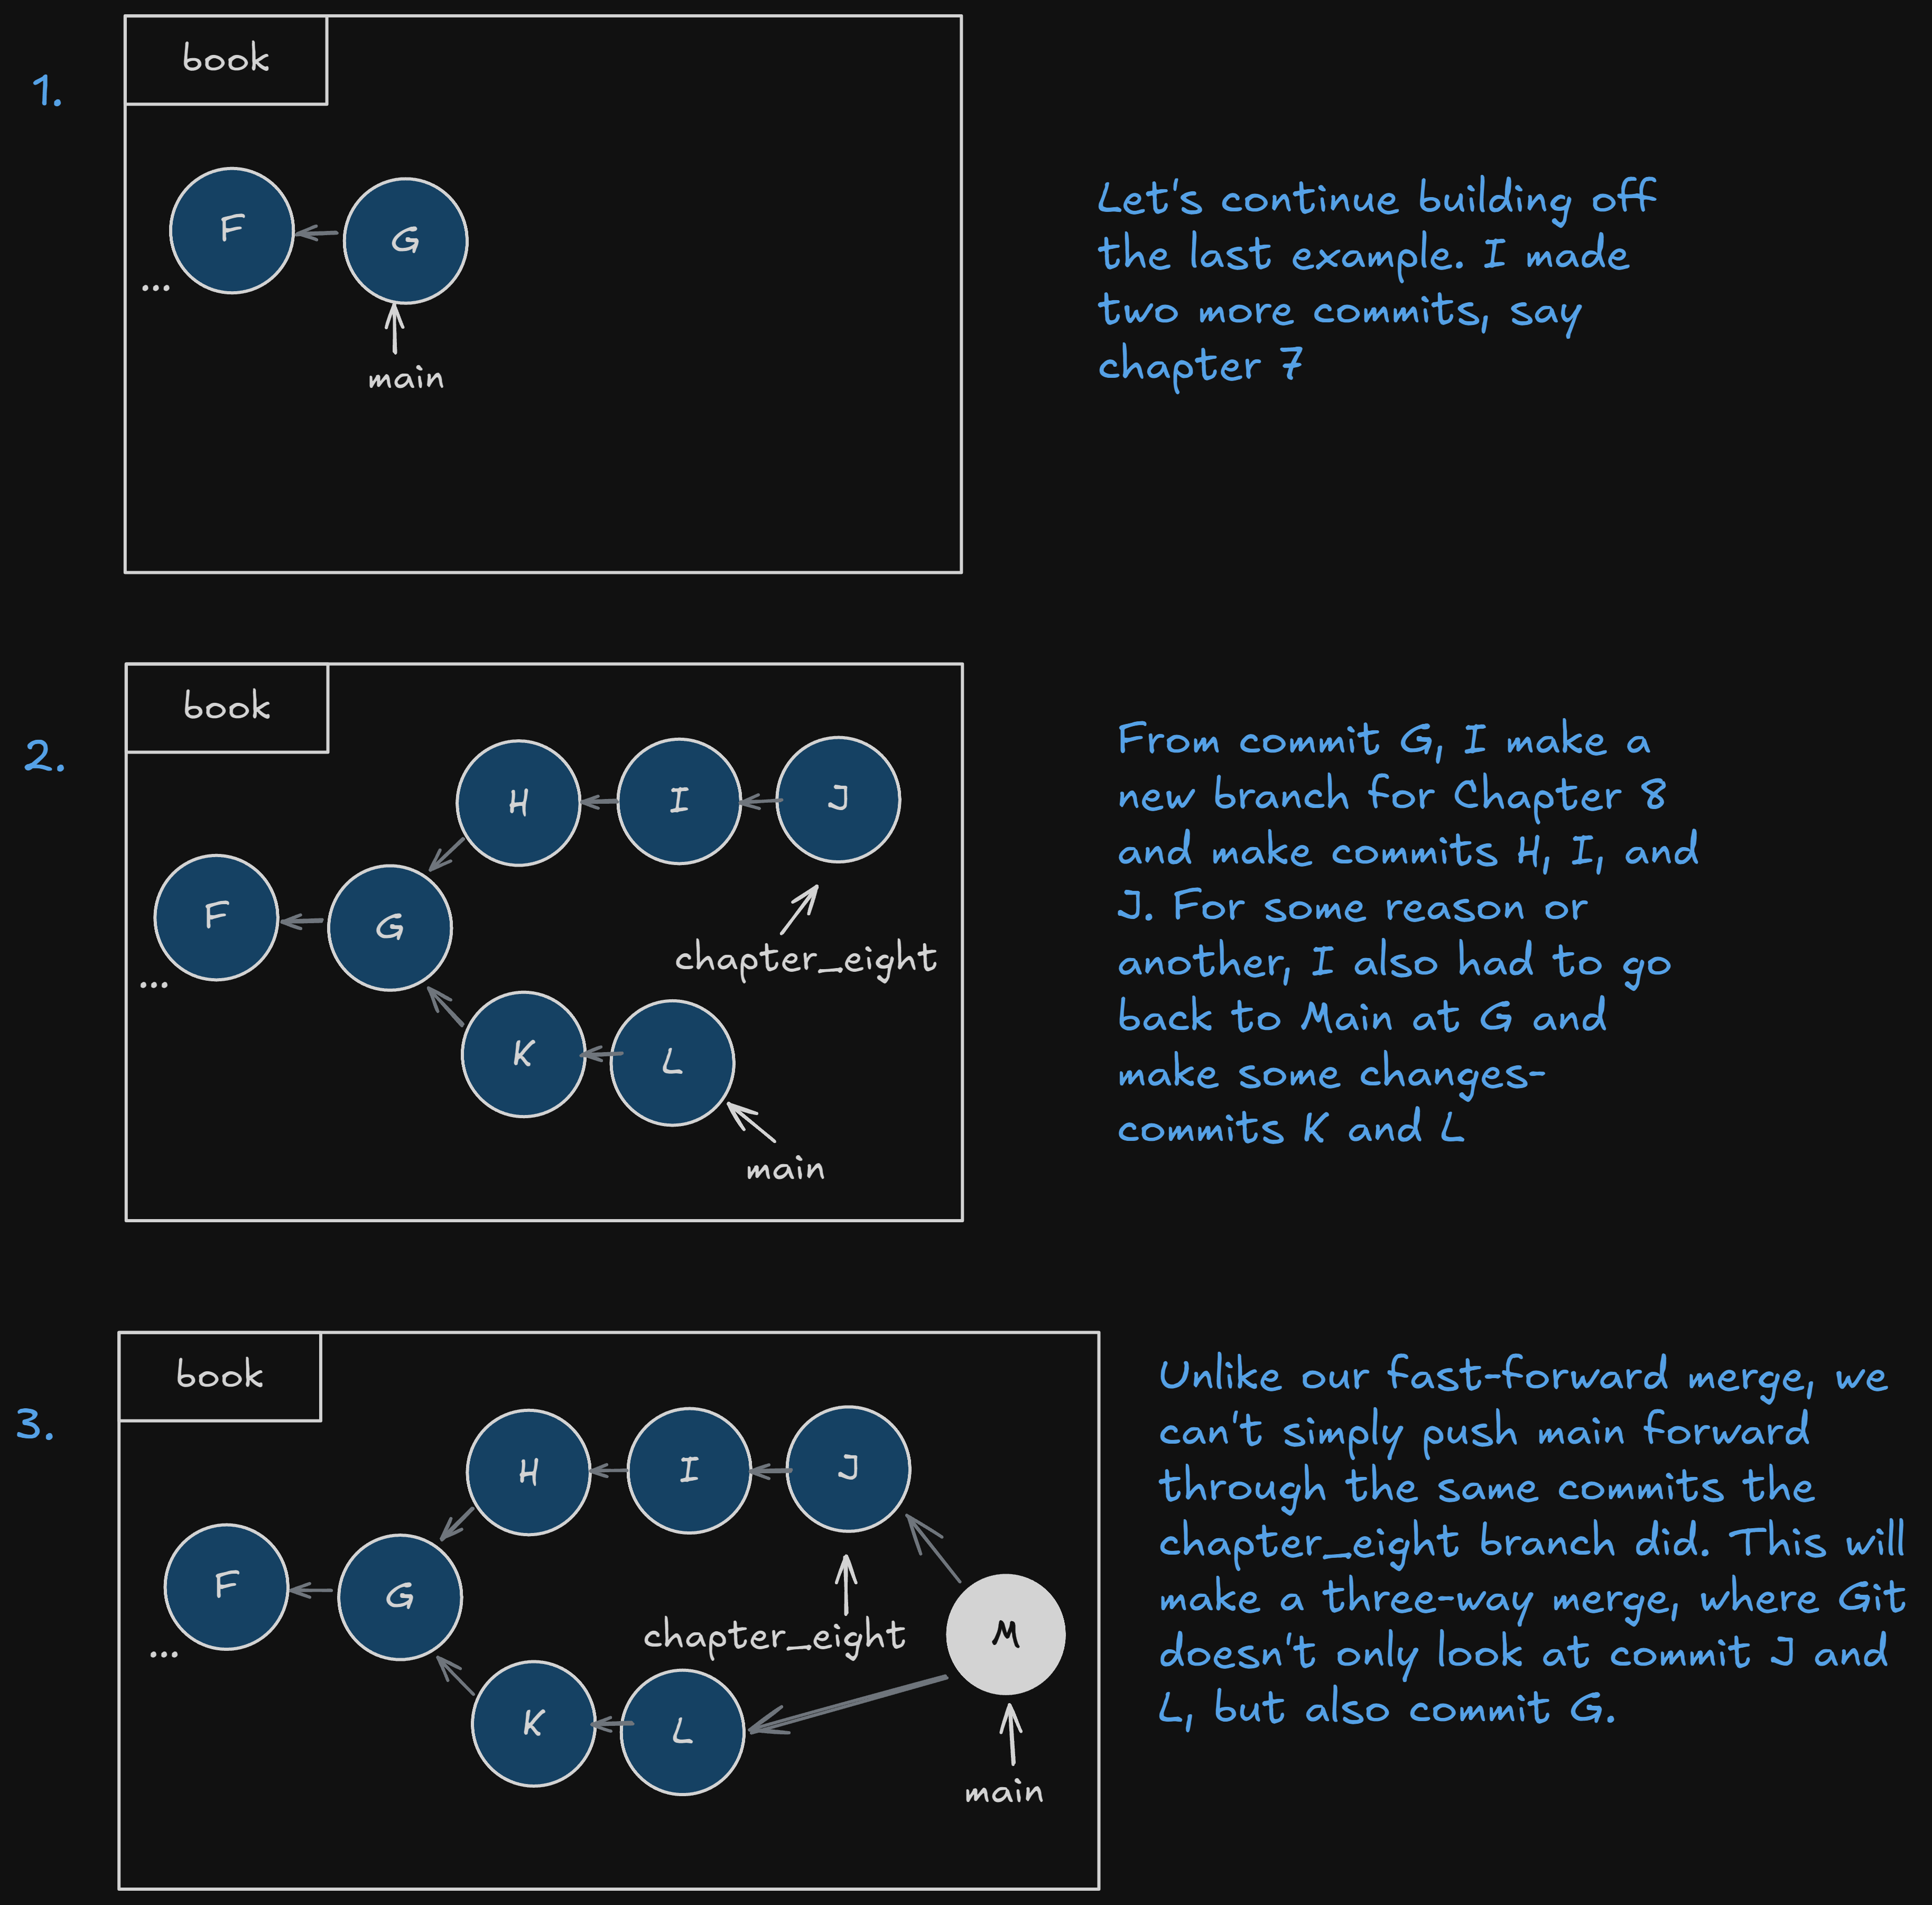
On the other side of the spectrum, if your development histories have diverged, we’d have to perform a three-way merge.
Example of a Three-Way Merge:
Three-way merges are unfortunately complicated. During the merge, we might encounter what we call a merge conflict, which can happen if both merges edits in the same parts/lines of a file, or if one branch deleted a file while another didn’t. We can explore this in more detail in the later chapters (9 and 10 apparently) so let’s just focus on getting our Rainbow project going.
Doing a Fast-Forward Merge
Let’s make sure we’re in our rainbow directory, so we can merge our feature branch into our main branch. We know from our diagram in the last chapter, that our yellow commit is where HEAD is pointing and we’re in a new branch, feature.
Now to commit a merge, it happens in two steps:
- Switch onto the target branch
- Use
git merge <branch_name>with the name of the source branch as thebranch_name.
There are two lessons that we should try to identify while doing this merge; Git will help you prevent loss of work in any non-committed files, and when you change a branch the working directories contents may change.
In regards to the first point, let’s look at our book example to see how Git protects you;
[!Example Book Project] Let’s say we’re about to start
chapter_nine.txt. This time, I’m going to make two branches,chapter_nine_aandchapter_nine_b. If I switch tochapter_nine_aand make some commits, then switch thechapter_nine_b, make edits without any commits, Git will stop me from switching to any other branches before making my next commit.
We can try this out with our rainbow repository. While on the feature branch, we can add “Green is the fourth color of the rainbow.” to rainbowcolors.txt. Now if you try to use git switch main, Git will give you an error saying there are uncommitted changes and abort the attempt.
To keep moving, go back to your rainbowcolors.txt file and undo the green sentence and save the file. If we switch our branch back to main, notice that we have a totally different working directory; our third color sentence does not appear in our rainbowcolors.txt.
We can use git log --all to see a list of commits in reverse chronological order for all branches within your local repository. We should be pointing HEAD at main now. Let’s finally make this merge happen;
>>> git merge feature
>>> git log
commit 43a7cffeceeaa1be4b55e94f4769ff5dc154cde4 (HEAD -> main, feature)
Author: mr-pointing <[email protected]>
Date:   Sat Sep 14 16:57:14 2024 -0400

    yellow

commit ae65b50098378ac6bf0cbe9ab92a9884b98db61b
Author: mr-pointing <[email protected]>
Date:   Fri Sep 13 15:59:13 2024 -0400

    orange

commit f54fa770db92bbe31125032abb853f7dd6af414b
Author: mr-pointing <[email protected]>
Date:   Thu Sep 12 15:59:22 2024 -0400

    red
Here’s an updated diagram of what our new directory looks like:
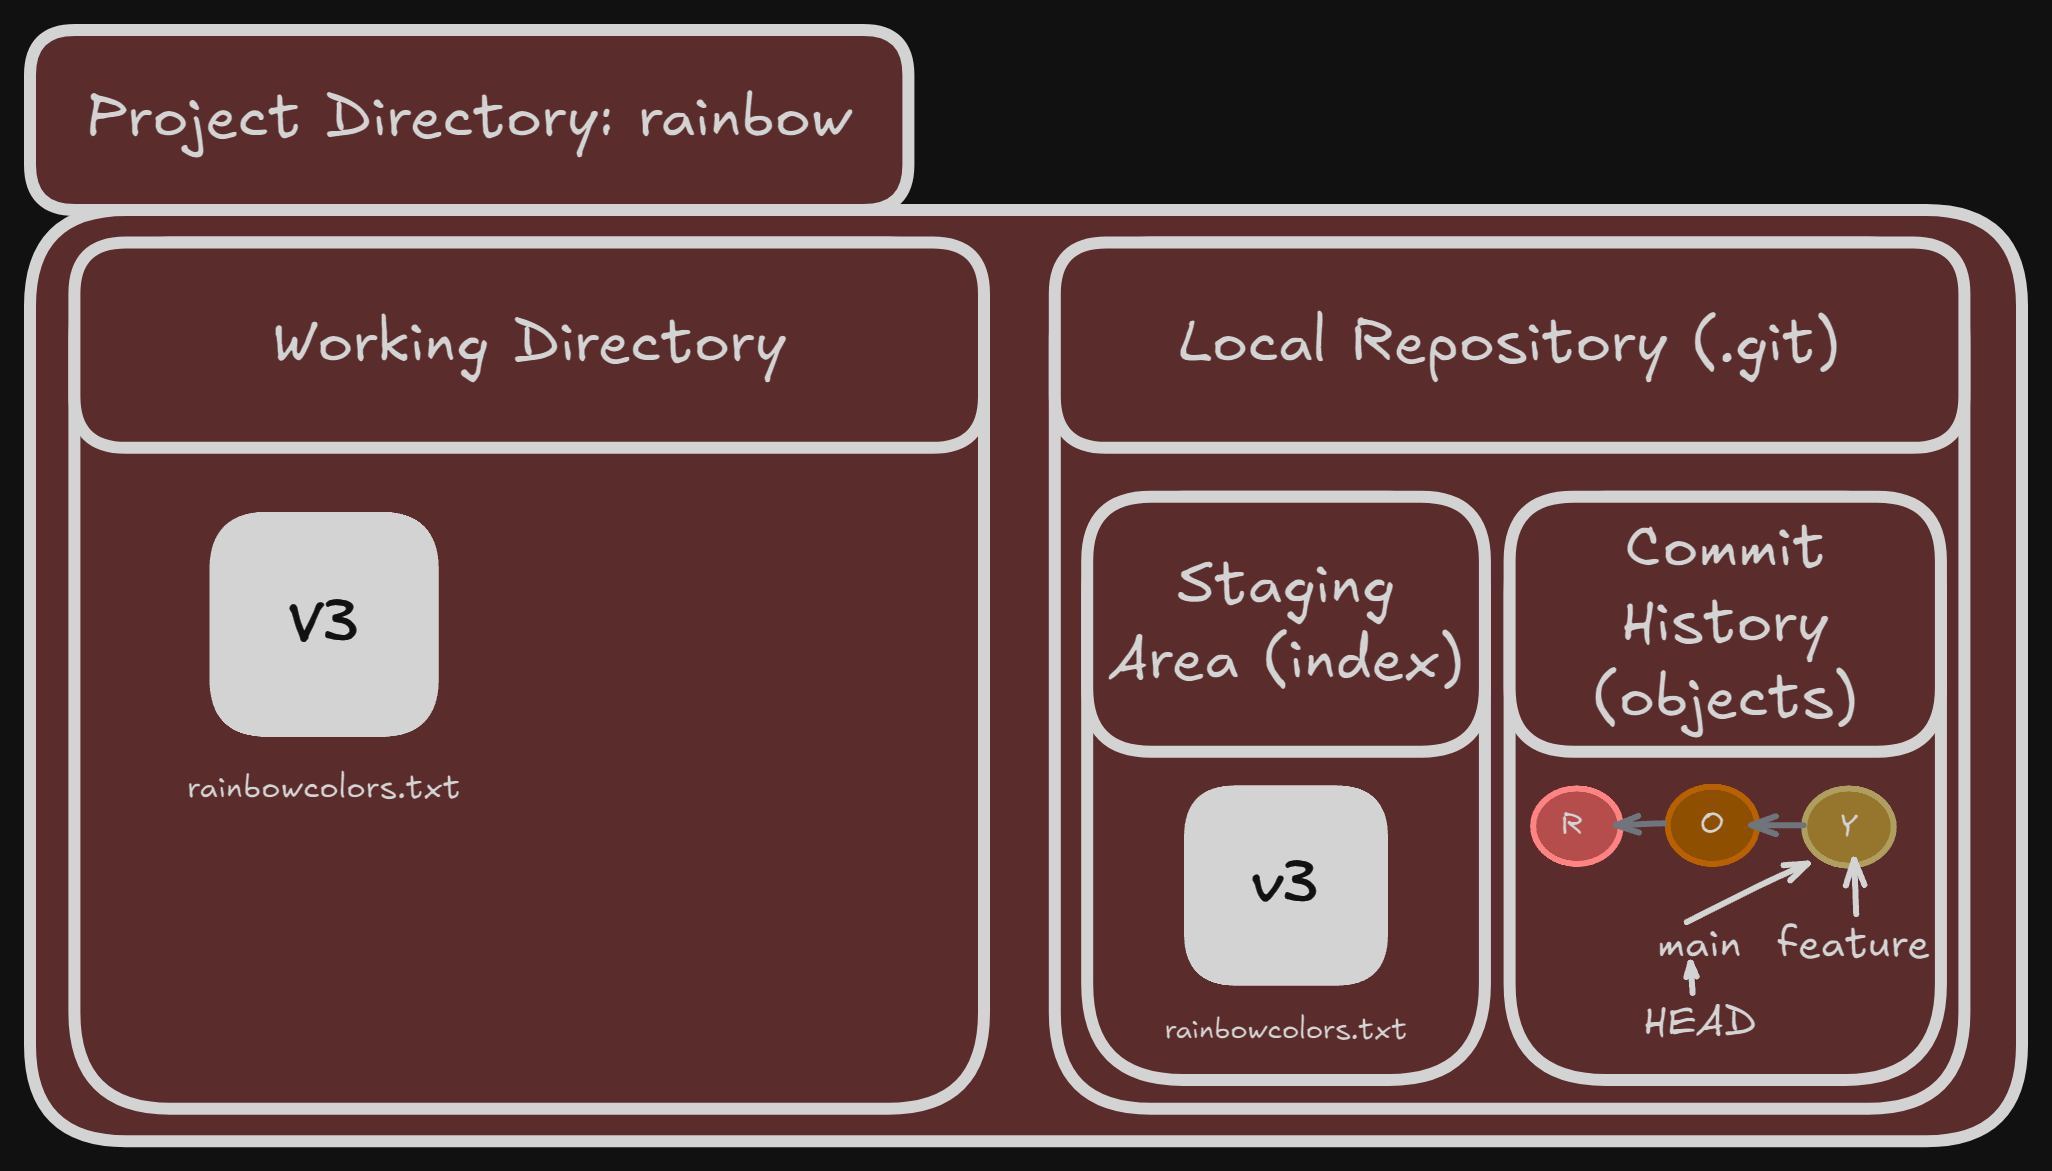
An important thing to notice is even after the merge, we didn’t get rid of the feature branch. Our main branch and feature branch are now both pointing at our yellow commit.
Checking Out Commits
Checking out is a way to view a commit that no longer has a branch pointing to it. For example, let’s say we wanted to go look at the state of our project at the orange commit. Right now, there are no available branches to switch too. In this case, we’d need to use the git checkout command.
The syntax is, git checkout <commit_hash>, where commit_hash is the hash of the commit you want to check out. Three things happen when you check out:
HEADpoints to the checked out commit- Staging area is populated with the files and directories used at that commit
- Staging area get’s copied into the working directory.
Just like switching branches, the contents of the working directory actively change to look like they did when that commit was made.
Unlike when we switched branches however, HEAD doesn’t point at any branches, just the commit. This is known as a detached HEAD state, and we should avoid making any changes/commits in this state. If we wanted too, we should first make new branch using git switch -c <new-branch-name>, then make some commits. Git will actually suggest this to you when you make a checkout;
>>> git checkout ae65b50098378ac6bf0cbe9ab92a9884b98db61b
Note: switching to 'ae65b50098378ac6bf0cbe9ab92a9884b98db61b'.

You are in 'detached HEAD' state. You can look around, make experimental
changes and commit them, and you can discard any commits you make in this
state without impacting any branches by switching back to a branch.

If you want to create a new branch to retain commits you create, you may
do so (now or later) by using -c with the switch command. Example:

  git switch -c <new-branch-name>

Or undo this operation with:

  git switch -

Turn off this advice by setting config variable advice.detachedHead to false

HEAD is now at ae65b50 orange
Funnily enough, because we moved backwards, using git log will only show the orange and red commit. We would need to use git log --all to see where our main and feature branch.
>>> git log --all
commit 43a7cffeceeaa1be4b55e94f4769ff5dc154cde4 (main, feature)
Author: mr-pointing <[email protected]>
Date:   Sat Sep 14 16:57:14 2024 -0400

    yellow

commit ae65b50098378ac6bf0cbe9ab92a9884b98db61b (HEAD)
Author: mr-pointing <[email protected]>
Date:   Fri Sep 13 15:59:13 2024 -0400

    orange

commit f54fa770db92bbe31125032abb853f7dd6af414b
Author: mr-pointing <[email protected]>
Date:   Thu Sep 12 15:59:22 2024 -0400

    red
Lastly, we just learned we can create and switch to a new branch using git switch -c <new_branch_name>. We can also do this using git checkout -b <new_branch_name>.
Next: Chapter 6