Learning Git - Chapter 4
Branches
We last left off with our first commit in our rainbow project. Remember, we can also use git status to get an update on the status of our repository. Before we get too deep into defining what a branch is, let’s explore why they’re used. That might make it a bit easier to understand.
Why Do We Use Branches?
Branches help us differentiate changes in a given project. They can be made for an number of reasons, but can be boiled down to two main points:
- Allows multiple people to work on the same project in different ways
- Allows multiple people to work on the same project at the same time
Depending on your projects need, the reasons for a branch will change. Some will use a main branch to represent the primary project, and use branches to create topic or feature branches. These branches will focus on the development of one specific part of the project.
[!Example Book Project] Instead of working on our book solo, we happen to have an editor that approves or denies all changes/edits made to the book. In order to make sure nothing is sent published before they look at it (committing to the main branch), I’ll create a secondary branch that I’ll work on, and after my editor looks at it and approves it, I’ll merge the secondary branch with the primary branch.
What EXACTLY are Branches in Git?
A branch is actually a movable pointer that’s pointing at a specific commit. When we used git log, you actually get the info on which branch is pointing to which commit.
>>> git log
commit f54fa770db92bbe31125032abb853f7dd6af414b (HEAD -> main)
Author: mr-pointing <[email protected]>
Date:   Thu Sep 12 15:59:22 2024 -0400

    red
From this we see that HEAD is pointing to main. The main branch is currently pointing to the red commit.
To really follow along, we can go through our rainbow directory and rummage through the git folder to see exactly whats going on. If you follow this path: rainbow/.git/refs/heads and open up main.txt, you should see your local red commit hash.
Within your heads directory are all of the local branches within your local repository. Since we only have the committed on a single branch, we’ll just have the single commit hash in the main.txt file.
I couldn’t believe this when I read it, but the male dominated sphere of tech being inclusive in their terminology? Call me surprised but it’s real. The original term for your main branch used to be master… definitely not inclusive terminology. I’m shocked mostly because so much of the tech sphere is left uncensored. Not really saying they deserve claim of being an “inclusive space”, but it’s a step in a better direction.
You can give your main branch any name you want. By default it will be master if not specified when initialized, but anything will do. Main is standard, and it never hurts to follow the good old common practices. More often than not, following the standards leads to less errors especially at first.
Unmodified and Modified Files
All files in your git project exist in the state of either modified or unmodified, after your first commit. Our rainbowcolors.txt is currently unmodified following our first commit. Once we edit it, however, it will become modified. Simple concept, but if not paying attention, can cause unforeseen issues.
Let’s not worry about issues. Let’s add the following text to our rainbowcolors.txt file, “Orange is the second color of the rainbow.” Then you can run git status to see our updates in real time.
>>> git status
On branch main
Changes not staged for commit:
  (use "git add <file>..." to update what will be committed)
  (use "git restore <file>..." to discard changes in working directory)
	modified:   rainbowcolors.txt

no changes added to commit (use "git add" and/or "git commit -a")
Obviously since we haven’t made any git actions nothing has changed with our branch. We do though know about modified vs unmodified, so we can reckon that our rainbowcolors.txt changed from unmodified to modified. Our next objective logically, if this was all we wanted to accomplish for this task, is to add, commit, and be on with our day.
>>> git add rainbowcolors.txt
>>> git status
On branch main
Changes to be committed:
  (use "git restore --staged <file>..." to unstage)
	modified:   rainbowcolors.txt
>>> git commit -m "orange"
[main ae65b50] orange
 1 file changed, 1 insertion(+)
Calling git log would return,
>>> git log
commit ae65b50098378ac6bf0cbe9ab92a9884b98db61b (HEAD -> main)
Author: mr-pointing <[email protected]>
Date:   Fri Sep 13 15:59:13 2024 -0400

    orange

commit f54fa770db92bbe31125032abb853f7dd6af414b
Author: mr-pointing <[email protected]>
Date:   Thu Sep 12 15:59:22 2024 -0400

    red
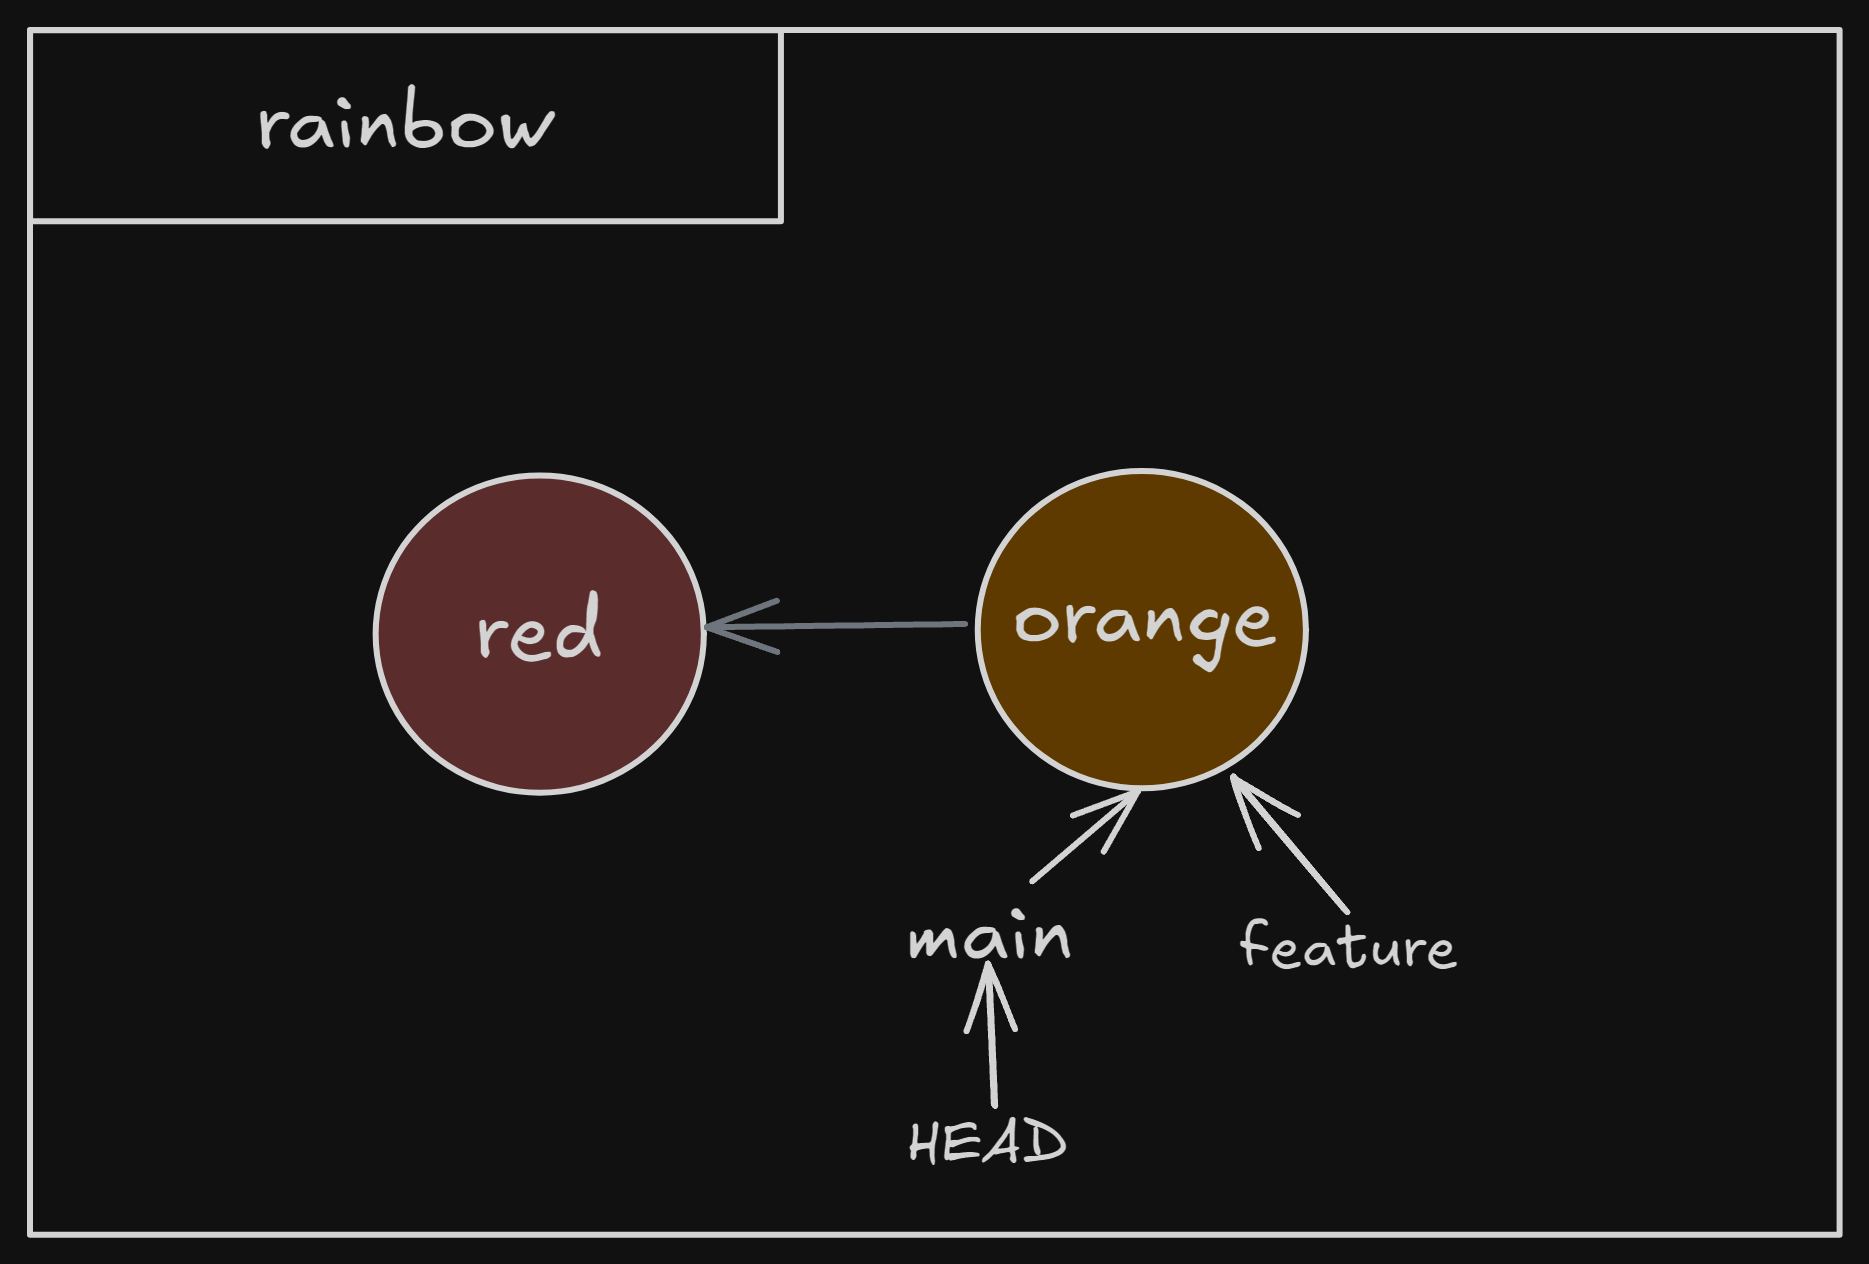
We can look at the following diagram for how the progress through our commits works,

The main branch pointed to our first commit, until our second commit which points to our orange commit. The gray arrow indicates a parent link, which points from a commit to the preceding commit.
You can find the parent of any given commit using the command git cat-file -p <commit hash>. For me, this returned,
>>> git cat-file -p ae65b50
tree 697fd6cb527d4f4b27ddab54c360cc64da72cf5d
parent f54fa770db92bbe31125032abb853f7dd6af414b
author mr-pointing <[email protected]> 1726257553 -0400
committer mr-pointing <[email protected]> 1726257553 -0400

orange
And if again, if you were really following at path rainbow/.git/refs/heads and open up main.txt, it will have our orange commit hash.
Create a Branch
Making a new branch is as easy as listing them out. We can use the git branch command to list out all the branches in our local repository, and use git branch <branch_name> with a name of any non-existing branch name to create it. Let’s make a feature branch,
>>> git branch
* main
>>> git branch feature
>>> git branch
  feature
* main
>>> git log
commit ae65b50098378ac6bf0cbe9ab92a9884b98db61b (HEAD -> main, feature)
Author: mr-pointing <[email protected]>
Date:   Fri Sep 13 15:59:13 2024 -0400

    orange

commit f54fa770db92bbe31125032abb853f7dd6af414b
Author: mr-pointing <[email protected]>
Date:   Thu Sep 12 15:59:22 2024 -0400

    red
You can see that when listing out our branches, main had a star next to it. That indicates that’s where HEAD is pointing, which we’ll discuss in a second. Before we get there, we should clarify that when a new branch is created, it will initially point at the same commit you’re on when you make it. That’s why it says (HEAD -> main, feature) when git log is called.
What is HEAD?
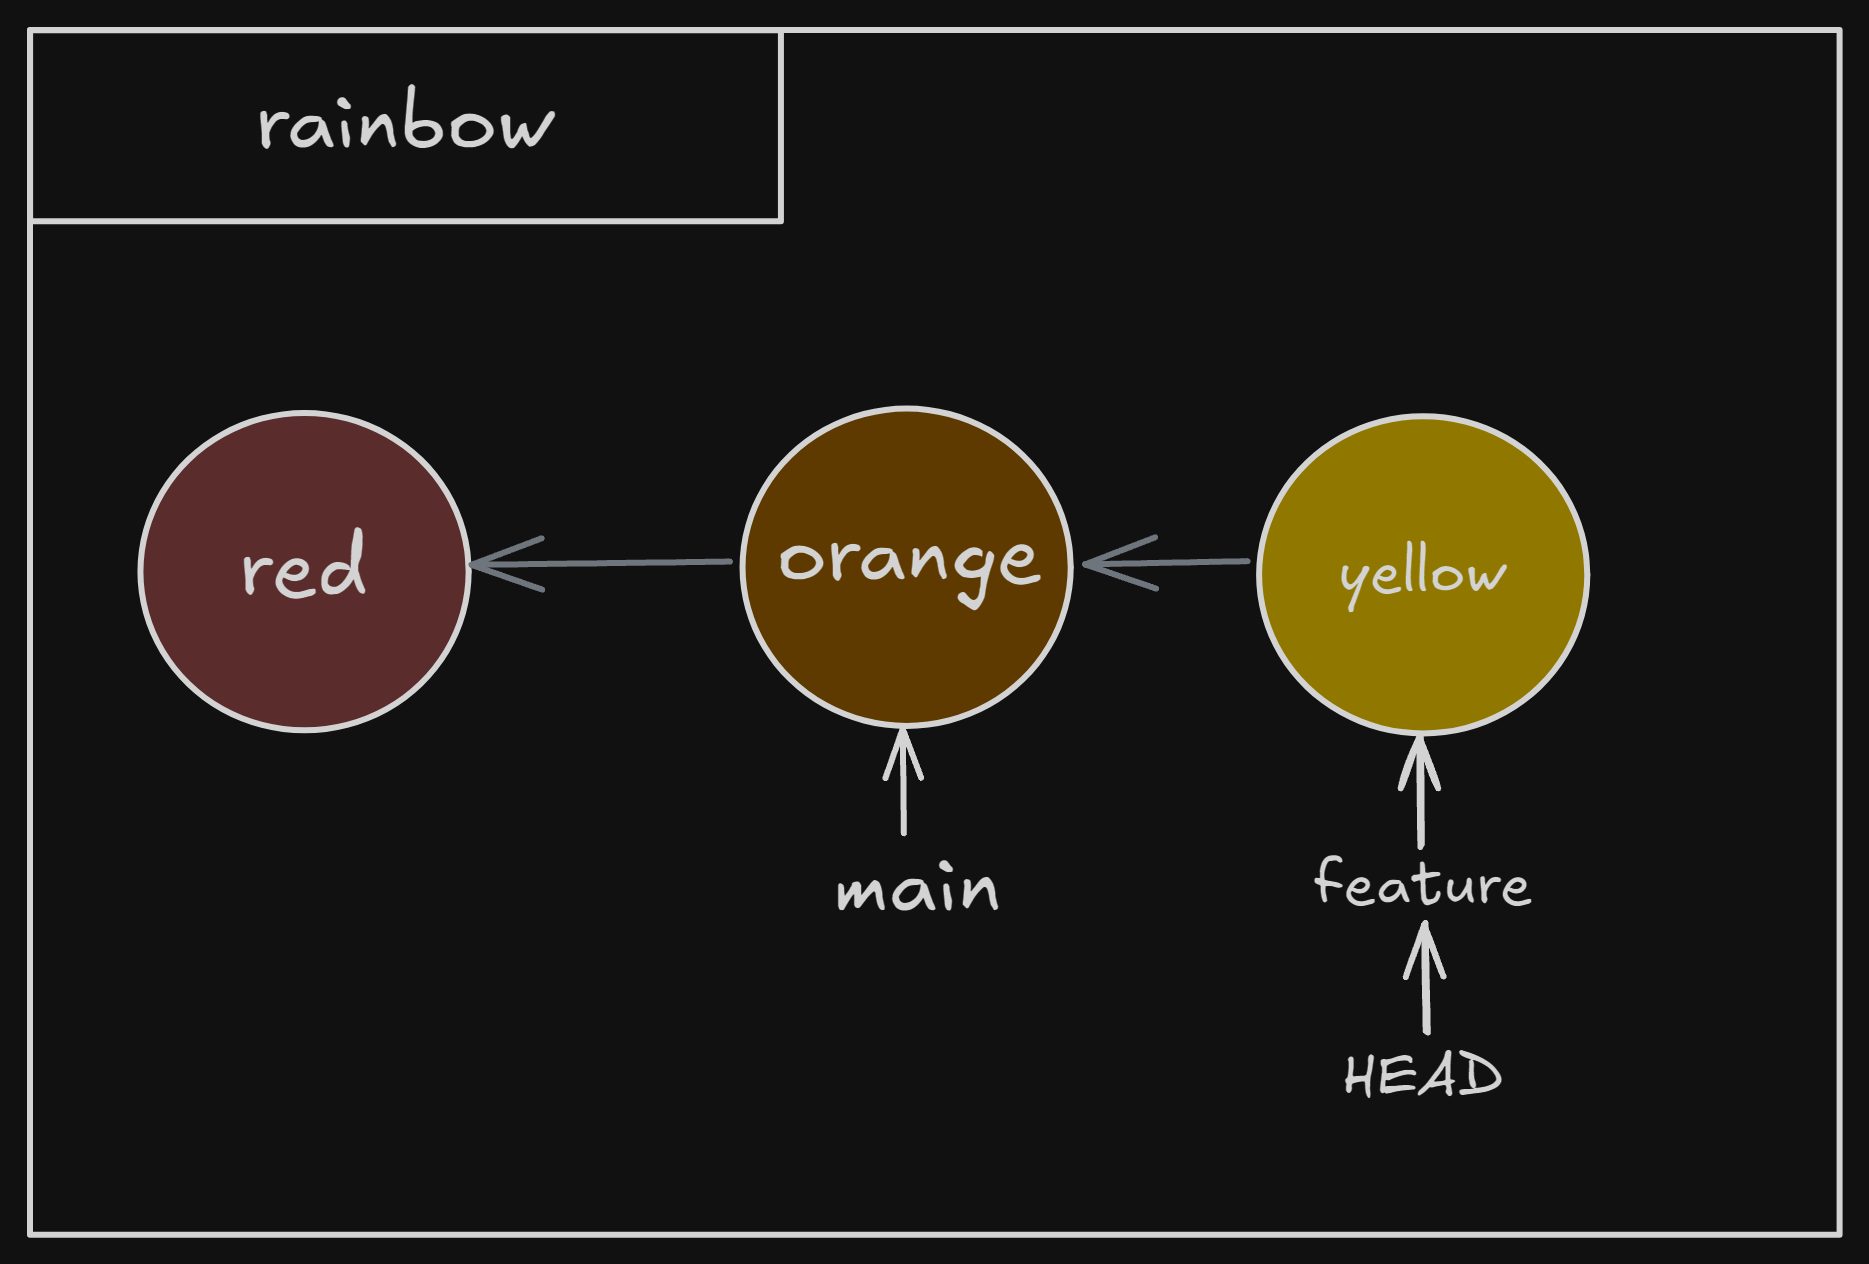
Simply put, HEAD is a pointer that tells you where you’re currently at. Let’s update our diagram;
We added in our feature branch, as well as the HEAD pointer. You could also gather more info from going into the HEAD.txt file in /rainbow/.git. It should say ref: refs/heads/main.
Switching Branches
When you switch branches, or “check out” a branch, you begin working in that new branch. This concept is strict and is why you don’t automatically begin working in the new branch created.
You can use two commands to move to a new branch; git switch <branch_name> or git checkout <branch_name>. Both can switch branches, but checkout can do that and a little more. For now though, we’re mostly going to use switch.
Three things happen when we switch branches:
HEADpoints to the branch you’re switching too- The staging area contains a snapshot of your commit you’re switching onto.
- Copies the contents of the staging area into the working directory
>>> git switch feature
Switched to branch 'feature'
>>> git branch
* feature
  main
>>> git log
commit ae65b50098378ac6bf0cbe9ab92a9884b98db61b (HEAD -> feature, main)
Author: mr-pointing <[email protected]>
Date:   Fri Sep 13 15:59:13 2024 -0400

    orange

commit f54fa770db92bbe31125032abb853f7dd6af414b
Author: mr-pointing <[email protected]>
Date:   Thu Sep 12 15:59:22 2024 -0400

    red
The asterisk switched from main to feature, and HEAD is now pointing at feature as well. If you were to check out that HEAD.txt file, you’ll see it now says ref: refs/heads/feature.
Working on a Separate Branch
Now that we’re in a new branch, let’s see what happens we start working. We can add in our third color, yellow, in our usual fashion of appending “Yellow is the third color of the rainbow.” to rainbowcolor.txt, adding and committing it, and taking a look at git log to see the changes,
>>> git add rainbowcolors.txt
>>> git commit -m "yellow"
[feature 43a7cff] yellow
 1 file changed, 1 insertion(+)
>>> git log
commit 43a7cffeceeaa1be4b55e94f4769ff5dc154cde4 (HEAD -> feature)
Author: mr-pointing <[email protected]>
Date:   Sat Sep 14 16:57:14 2024 -0400

    yellow

commit ae65b50098378ac6bf0cbe9ab92a9884b98db61b (main)
Author: mr-pointing <[email protected]>
Date:   Fri Sep 13 15:59:13 2024 -0400

    orange

commit f54fa770db92bbe31125032abb853f7dd6af414b
Author: mr-pointing <[email protected]>
Date:   Thu Sep 12 15:59:22 2024 -0400

    red
Our visual diagram now looks more like this;
Next: Chapter 5