Geometry Managers
Controlling Layouts with Geometry Managers
Tkinter has three geometry managers, or methods that define how the content of your app is structured. .pack() is just one of them; we also could use .place() or .grid(). You can only use one at a time, so let’s discover the instances in which we’d use them.
.pack()
When using .pack(), you’re actually using a packing algorithm in order to place the widgets on screen. It accomplishes this in two steps;
- Creates a parcel, or a rectangular shape that is large enough for the content within it (the rest of the window is filled with empty space)
- Automatically centers the widget inside the parcel unless another location is given
We could visualize how this works by using three .pack() statements after one another with varying sizes to see how pack will structure our app:
import tkinter as tk

window = tk.Tk()

frame1 = tk.Frame(master=window, width=100, height=100, bg='red')
frame1.pack()

frame2 = tk.Frame(master=window, width=50, height=50, bg='green')
frame2.pack()

frame3 = tk.Frame(master=window, width=25, height=25, bg='blue')
frame3.pack()

window.mainloop()
Since we packed our red frame first, that box will appear first. Same goes for our green and blue boxes. Again, we see that since we offered no anchor point, we have centered boxes again.
.pack() takes a few useful arguments we should discuss. The first is to use fill with X, Y, or BOTH. X will fill the window in horizontal directions, Y fills the window in vertical directions, and BOTH will fill in both directions. Using this feature with hard-coded width and heights is a little tricky. I suggest playing around with different features and seeing what you get.
Here’s what I noticed;
- When using
fill=tk.Xwith a dedicated height and width, it worked as I thought. It also worked as intended with just a height, but not with only a width. - When using
fill=tk.Ywith a dedicated height and width, it didn’t work the way I thought. I figured it would take up the window as I made it longer, but it stayed it’s 100x100 size. I even thought it had something to do with the other frames being packed, but even with them removed I couldn’t get it to expand vertically. Even with a solo height and solo width, I wasn’t able to get it to work.- I ended up having to use another argument,
expand, and set it equal toTrueto get the fill to actually work vertically
- I ended up having to use another argument,
- With
fill=tk.BOTH, along withexpand=True, you can nicely get it to expand in all directions. You can even let it rock with no height or width, and it’ll function just fine.
.place()
The .place() manager uses exact locations when organizing and structuring widgets. .place() takes two arguments, x and y. The one thing to be aware of when using .place() is that your screens point of origin, or (0, 0), is at the top left of your screen, and the limit of your screen is the bottom most right-hand side.
The following code is an easy example of placing label widgets within a packed frame;
import tkinter as tk

window = tk.Tk()

frm = tk.Frame(master=window, width=150, height=150)
frm.pack()

lbl1 = tk.Label(master=frm, text="I'm at (0, 0)", bg='red')
lbl1.place(x=0, y=0)

lbl2 = tk.Label(master=frm, text="I'm at (75, 100)", bg="yellow")
lbl2.place(x=75, y=100)

window.mainloop()
You might notice when running this example, our yellow box is cut off. That’s because our Frame isn’t large enough. We would need to expand it a little bit (perhaps to 200) to actually let it render fully.
This reason is a large part of why .place() isn’t all that great. Screen sizes vary on multiple different factors (operating systems, size and form-factor, fonts, etc.) making it difficult to account for where something will be compared to other elements. If your locations are relevant to your application thought (think of a map) .place() has it’s uses.
.grid()
The .grid() geometry manager is the one you’re more likely to use over packing or placing. Matter of fact, .grid() works really similarly to .pack() with even easier syntax.
.grid() will split your window or whatever Frame you’re using into rows and columns. The index locations for row and column position work just like they do in Python sequences, starting at position 0.
This gives us the ability to make really neat structures using basic looping. The following uses a double for loop to create a 3x3 area;
import tkinter as tk

window = tk.Tk()

for i in range(3):
	for j in range(3):
		frame = tk.Frame(
			master=window,
			relief=tk.RAISED,
			borderwidth=1
		)
		frame.grid(row=i, column=j)
		label = tk.Label(master=frame, text=f"Row {i}\nColumn {j}")
		label.pack()

window.mainloop()
We’re actually using two methods here; we’re using the grid() geometry manager to attach the frames to the window, then using pack() to attach the label to the master frame.
Just like CSS, we can include padding into the parameters of our grid() to create space between frames, with both padx and pady. If we pass them into pack(), it’ll create space between the text and the sides of each frame.
...
		frame.grid(row=i, column=j, padx=5, pady=5)
		...
		label.pack(padx=5, pady=5)
...
Doing this will start to make our window look nice, but if you resize the window it immediately start to looks bad. To avoid this, we can use methods of our window to tell it what to do when resizing.
...
for i in range(3):
	window.columnconfigure(i, weight=1, minsize=75)
    window.rowconfigure(i, weight=1, minsize=50)
...
Creating a Submission Form
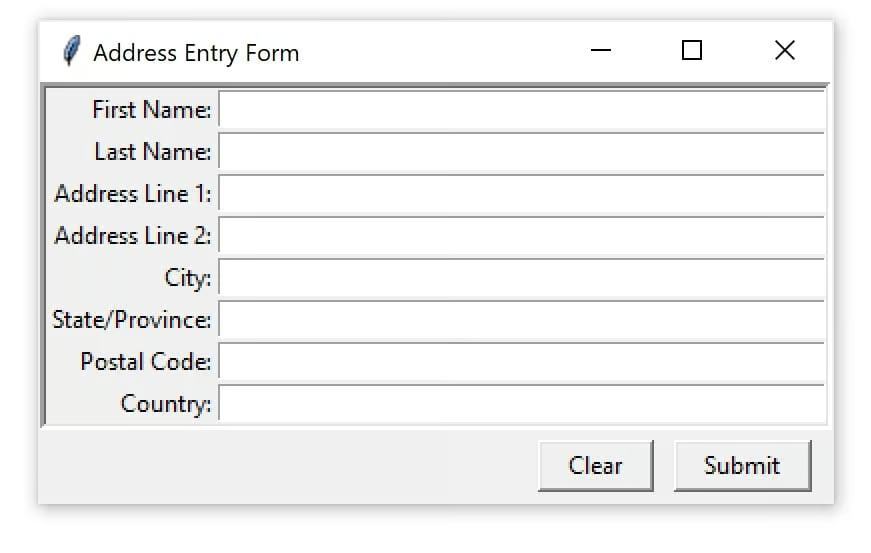
Here’s what we need to create: simple right?
I understood right away that having to individually make and pack each line is possible, but would be a lot and ugly. So, thinking programmatically, we can use a loop structure to move through categories to create new labels and entries. I needed to look at their submission to effectively get the stacking method right on what to pack and what to grid, but I don’t like how their buttons don’t stick to the form:
import tkinter as tk

window = tk.Tk()

entry_cats = ['First Name: ', 'Last Name: ', 'Address: ', 'City: ', 'State: ', 'Zip: ', 'Country: ']

entry_frame = tk.Frame(
    relief=tk.SUNKEN, borderwidth=3
)
entry_frame.pack(padx=5, pady=5)

button_frame = tk.Frame(
)
button_frame.pack(fill=tk.X, ipadx=5, ipady=5)

for i, text in enumerate(entry_cats):
    label = tk.Label(master=entry_frame, text=text)
    entry = tk.Entry(master=entry_frame, width=75)

    label.grid(row=i, column=0, sticky="e")
    entry.grid(row=i, column=1)

submit_button = tk.Button(
    master=button_frame,
    text="Submit",
    width=10,
    height=2
)
submit_button.pack(side=tk.RIGHT, padx=10, pady=10)
clear_button = tk.Button(
    master=button_frame,
    text="Clear",
    width=10,
    height=2
)
clear_button.pack(side=tk.RIGHT, padx=10, pady=10)

window.mainloop()
I personally think this looks a little bit nicer:
import tkinter as tk

window = tk.Tk()

entry_cats = ['First Name: ', 'Last Name: ', 'Address: ', 'City: ', 'State: ', 'Zip: ', 'Country: ']

entry_frame = tk.Frame(
    relief=tk.SUNKEN, borderwidth=3
)
entry_frame.pack(padx=5, pady=5)


left_off = 0
for i, text in enumerate(entry_cats):
    label = tk.Label(master=entry_frame, text=text)
    entry = tk.Entry(master=entry_frame, width=75)

    label.grid(row=i, column=0, sticky="e")
    entry.grid(row=i, column=1)
    left_off = i

submit_button = tk.Button(
    master=entry_frame,
    text="Submit",
    width=10,
    height=2
)
submit_button.grid(row=left_off+1, column=1, sticky="e", padx=10, pady=10)
clear_button = tk.Button(
    master=entry_frame,
    text="Clear",
    width=10,
    height=2
)
clear_button.grid(row=left_off+1, column=1, sticky="e", padx=100, pady=10)

window.mainloop()
Next: Interactive Applications